Introduction
The SKSNG907, SKSNG907RV, SKSNG907G & SKSNG907RVG SmartKey Starter® remote start and alarm module is compatible with Compustar alarms for full aftermarket alarm integration.
Note: if adding a CM, the OEM key fob will no longer remote start the vehicle and an external remote and/or Drone must be added for remote start. OEM fob will still arm and disarm the alarm.
Compatible Compustar systems:
- CM7000
- CM7200 (in alarm / RS mode)
- CM900
- CMX
Alarm connections:
- RS232 (with RX and TX wires opposite on each end)
- Power and ground (from low current harness) - connected to SKSNG907 / SKSNG907RV T-harness
- Ignition (to fuse box)
- Siren
- Hood pin
- Alarm accessories (DAS sensor, Drone, RF remotes, RPS touch, sensors, etc
Alarm programming:
Note: if the alarm was purchased from Mid City Engineering, it will already be programmed to work with the SmartKey Starter®
- Option 2-10 must be set to #4 (advanced tachless / no connection).
- Run time- when remote start is activated through the alarm (RF remotes, Drone, etc), the run time set on the Compustar alarm will determine how long the van runs unless the SmartKey Starter® timer is set for less time than the Compustar module. The default run time setting for the SKSNG907 & SKSNG907RV is 1 hour. SKS run time can be changed using the instrument cluster menu. Instructions for menu operation here
Compustar alarms purchased from Mid City Engineering will be programmed for 45 minute run time.
If remote start is activated through the OEM key fob or the analog trigger, the run time will be determined by the value set on the SmartKey Starter®
Note: if adding an external alarm, Compustar Drone / external remotes should be used for remote start activation. The OEM key fob remote start activation when using an external alarm is not supported at this time. The OEM remote will arm and disarm the alarm.
Tools
No tools specified.
Parts
-
-
CM7000 / CM7200 must be programmed for advanced tachless / no connection (2-10 option 4 on the programming table)
-
If the alarm was purchased from Mid City Engineering, it will already be programmed to work with the SmartKey Starter®
-
Program desired run time for Compustar module. If alarm was purchased from Mid City Engineering, the alarm run time will be set for 45 minutes.
-
When remote start is activated through the alarm (RF remotes, Drone, etc), the run time set on the Compustar alarm will determine how long the van runs unless the SmartKey Starter® timer is set for less time than the Compustar module.
-
The default run time setting for the SKSNG907 & SKSNG907RV is 1 hour. SKS run time can be changed using the instrument cluster menu. Instructions for menu operation here
-
-
-
This step is for automatic transmission vehicles only
-
For automatic transmission vehicles, the green loop inside the small access panel on the CM7000 must be cut
-
-
-
Power and ground from the low current harness on the Compustar alarm can be connected at the SKS T-harness. Use the side of the T-harness connected to the module labeled SmartKey Starter
-
Connect constant power wire from alarm to red wire on T-harness (see picture)
-
Connect ground wire from alarm to black wire on T-harness (see picture)
-
Be sure to solder and insulate all connections
-
-
-
Connect the green ignition wire from the the alarm to ignition power source. A diode should be used with the stripe facing the alarm.
-
If alarm was purchased from Mid City Engineering, there will be a diode in the alarm box.
-
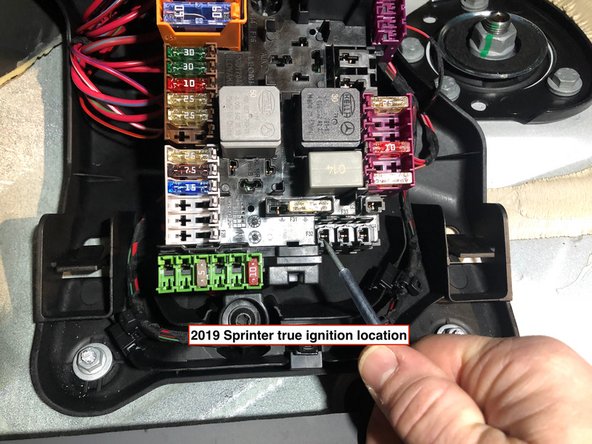
Ignition source can be found at fuse box on passenger side under the floor (under the emergency kit). See picture for fuse location. A spade terminal can be used to secure ignition wire to fuse location.
-
-
-
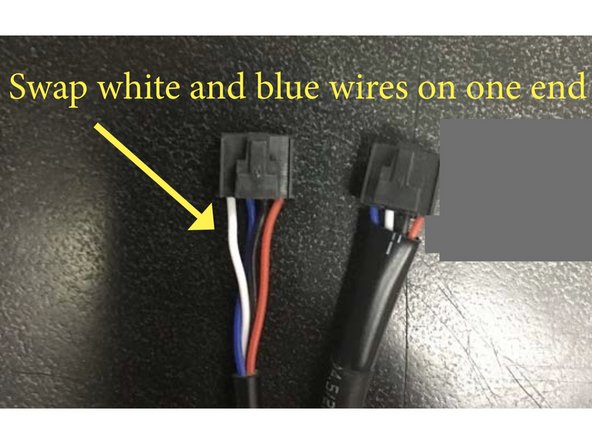
An RS232 cable is used to connect the Compustar alarm to the SmartKey Starter®. The RX and TX wires (white and blue) must be opposite on each end. Most cables will need to have the RX and TX wires reversed on one end of the cable.
-
If the Compustar alarm was purchased from Mid City Engineering, the RS232 cable is provided in the alarm box. The wires are likely already reverse. Please compare the cable you have to this picture to confirm the wire orientation.
-
Using a pick tool, carefully de-pin the white and blue wires on one end of the cable.
-
Re-pin the white and blue wires so that they are in opposite order of the other plug on the cable.
-
Reference picture to be sure cable is pinned correctly.
-
-
-
Connect one end of the RS232 cable into the gray port labeled Drone on the module labeled SmartKey Starter®
-
Connect the remaining end of the RS232 cable into the black port on the Compustar alarm
-
-
-
For firmware version 5.26 and up, hood pin will connect directly to the gray wire on the SmartKey Starter module. Follow steps on hood pin for SmartKey Starter installation instructions here
-
MY 2025 Sprinter (SKSNG907G and SKSNG907RVG) has an OEM hood pin, so a hood pin is not included with the SKSNG907 and SKSNG907RVG and a hood pin does not need to be installed.
-
-
-
Connect and mount siren per instructions included with Compustar alarm
-
The red wire from the siren gets connected to the siren output on the Compustar alarm (brown wire, larger harness). The black wire for the siren connects to chassis ground.
-
-
-
Connect DAS sensor included with Compustar alarm into Compustar alarm module per instructions included with alarm.
-
Connect extra sensors (optional)
-
-
-
Connect any accessories being used to alarm (Drone, RF remotes, RPS touch, etc).
-
When using external alarm, remote start activation should be done through either Drone or RF remotes. OEM fob remote start activation is not supported with the use of an external alarm at this time. The OEM remote will arm and disarm the alarm.
-
-
-
Test alarm operations
-
Securely mount all modules, sensors, antennas, and other accessories.
-