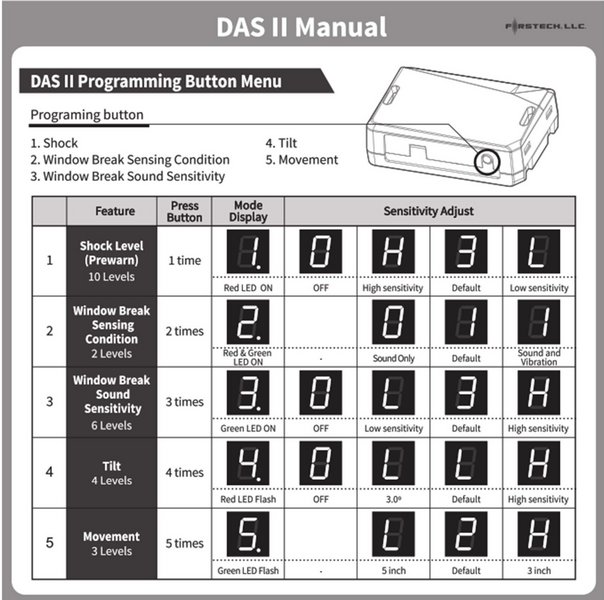
For SmartKey Starter® systems without the instrument cluster menu or alarm only kits with no extended range RF remote (OEM key fob only), you can adjust the sensitivity of the DAS II security sensor using the buttons and LED display on the sensor itself.
Note: For SmartKey Starter® systems where the instrument cluster menu is available, it is recommended to adjust the sensititvy using the settings menu. Click here for instrument cluster menu operation.
The Compustar DAS II sensor is pre-programmed to a default sensitivity which is good for most applications. If the sensitivity needs to be adjusted, follow these steps:
- Close all doors, hood, and trunk with ignition off
- Press lock on the OEM remote to arm the alarm
- At this time the DAS-II display will initialize and stay powered and be adjustable for the 30 seconds prior to the sensor being fully armed. Note: because of the time limitation, adjusting multiple sensitivity settings may take more than one 30 second window. To enter programming again, disarm alarm by pressing the unlock button on the OEM remote and begin at step 2.
- Push the programming button repeatedly until the desired sensor has been selected 1-5 shown in the table below. (The programming button will be used to navigate the sensor adjustments and sensitivity once a sensor has been selected).
- Once the sensor has been selected hold the programming button for 2 seconds
- to confirm selection and enter sensitivity adjustment. The adjustment options will now be accessible with default setting displayed. (Sensitivity options will be shown in table below).
- Push the programming button repeatedly until desired sensitivity level is reached (setting 0 will indicate sensor is OFF => except option 2 window break sensor conditions)
- Hold programming button for 2 seconds to save sensitivity setting. After the setting is saved the sensor will start over at sensor 1 again. (if the programming button is not pressed within 5 seconds after setting the LED will flash 2 times, save the setting and exit sensor programming)
- Programming completed, disarm and re-arm alarm, close all windows and doors and begin testing