Introduction
This guide provides step by step installation and operation instructions for installing a remote start on the Mercedes Metris 2016-2023. The remote start includes basic alarm and can be integrated with Compustar Drone/ Directed Smart Start for smart phone control, Compustar /Directed RF remotes, and a Compustar DAS sensor for added security.
Installation requires the following steps:
-Removal of the EIS
-EIS modification. Note: we highly reccomend that the EIS be send to Mid City Engineering for modification. If you wish to perform modification, please contact us at 312-421-1114 or sales@midcityengineering.com for more information
OPTIONAL steps:
-Compustar Drone connection
-Compustar RF remote connection
-Compustar DAS sensor connection
-
-
Remove bezel around radio
-
-
-
Reach through cavity to left of radio grab EIS
-
The EIS has one tab on the top and one tab on the bottom- squeeze the tabs toward the middle of the cylinder and pull EIS out of dash towards hood
-
Remove EIS from dash and un-plug green 12 pin plug
-
Remove blue 8 pin plug
-
-
-
The SKSNG447D4T requires an EIS modification. It is highly reccomended that the EIS be sent to Mid City Engineering for modification
-
If you wish to perform modification without sending Mid City Engineering the EIS, please call 312-421-1114 or email sales@midcityengineering.com for more information
-
-
-
Plug 8 pin factory blue plug that was removed EIS into 8 pin blue socket on supplied T-harness
-
Plug 12 pin factory green plug that was removed EIS into 12 pin green socket on supplied T-harness
-
-
-
Plug 12 pin green plug from T-harness into 12 pin socket on rear of EIS
-
Plug 8 pin blue plug from T-harness into 8 pin socket on rear of EIS
-
-
-
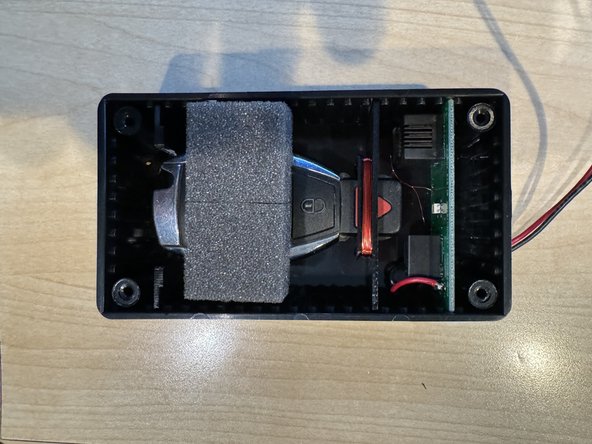
Remove battery from key
-
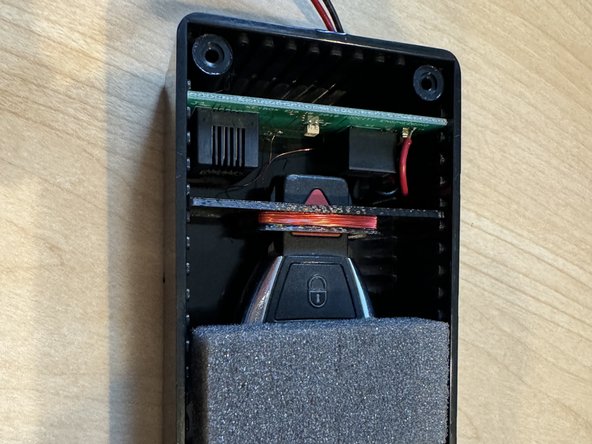
Insert key in key box as shown in picture. The key must be in the positioning shown in the picture.
-
Close and secure key box lid with provided screws
-
If the key box lid is not closed and any light is getting into the box, the remote start will not work.
-
-
-
Connect 20 pin connector from T-harness to 20 pin connector on SKSNG module
-
Plug 2 pin white plug from supplied key box to 2 pin white connector on SKSNG module
-
-
-
Route EIS through left side of radio cavity and into dash
-
-
-
Make sure that doors are closed and vehicle is in safe position to start
-
On factory key fob hit ‘lock-unlock-lock’
-
-
-
From inside vehicle with all doors closed, hit ‘lock’ on OEM fob
-
Parking lights should flash 3 times and the doors should lock
-
-
-
Open door from inside handle- siren should sound and parking lights should flash
-
-
-
Use zip ties to mount key box module and NG module together
-
-
-
Mount harnessing and module
-
Be sure to mount module away from any heat sources or moving parts
-
-
-
A Compustar DAS sensor can be added for shock, tilt, and vehicle movement security. This will integrate into the alarm included with the starter
-
Plug 4 pin cable from DAS sensor into 4 pin red plug on SKSNG module
-
Mount DAS sensor per Compustar instructions
-
-
-
Lock doors with OEM key fob
-
Apply impact to vehicle chassis - siren should alarm
-
-
-
A Compustar RF remote and antenna kit can be added for external control of remote start, alarm, and door locks.
-
Plug Compustar antenna cable into 4 or 6 pin blue plug on SKSNG module
-
-
-
Insert key and cycle from ‘OFF’ to ‘IGNITION’ (2nd position) 5X (ending in the ‘OFF’ position)
-
After 5th cycle, hit the ‘LOCK’ button on each Compustar RF remote that is being programmed (programming 2-way remotes first)
-
-
-
Using Compustar RF fob, test lock, unlock and start controls
-
-
-
Connect 4 pin connector from Compustar Drone module to 4 pin black plug labeled ‘DRONE’ on the SKSNG module
-
-
-
Using Compustar Drone app, test lock, unlock and start controls
-
-
-
Replace bezel and vents around radio and clip into place
-


