Introduction
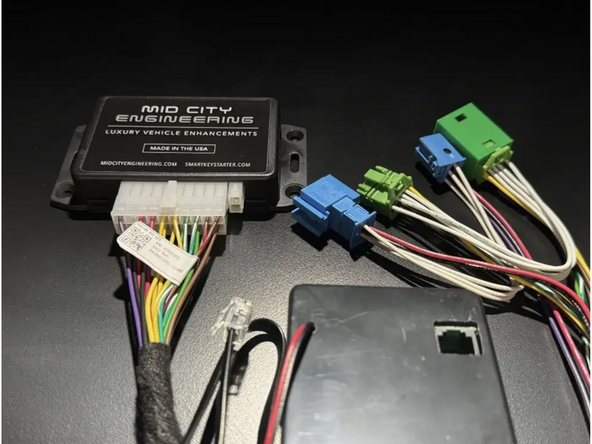
The SKSNG447D4T is a remote start and alarm interface for Mercedes Metris
Out of the box the remote start will working using the OEM key fob (1X press of the panic button or Lock-Unlock-Lock, if no panic button on key)
Vehicle Compatibility:
- Mercedes Metris 2016-2024
The SKSNG447D4T is compatible with the following add-ons:
- Any current Compustar Drone Smart Phone Control (X1, X2, LTE, MAX, XC)
- Compustar DAS II digital sensor for shock, tilt, glass break, and tow sensing (uses OEM horn for alarm)
- Compustar RF antenna and remotes (NON-AM remotes only, AM remotes NOT compatible)
- Directed Smart Start
- Compustar external remote start + alarm brain (eg, CM900, CMX)
The installation to the vehicle involves the following:
- EIS jumper modification
- T-harness connection behind the EIS (electronic ignition switch)
- Key box installation (extra key required for installation)
- Optional accessories and add-ons
There is no flashing required for this installation, but options settings can be programmed using the instrument cluster menu. See user's manual (link below) for options settings. Please go through menu to make sure settings such as run time are set to preferred setting.
DO NOT MOUNT THE MODULE NEAR ANY HEAT SOURCES IN THE VEHICLE. SPECIFIC LOCATIONS TO AVOID ARE THE HEATER CORE ANDTHE TRANSMISSION TUNNEL
See end of guide for troubleshooting error codes
Tools
No tools specified.
Parts
-
-
Remove bezel around radio
-
-
-
Reach through cavity to left of radio grab EIS
-
The EIS has one tab on the top and one tab on the bottom- squeeze the tabs toward the middle of the cylinder and pull EIS out of dash towards hood
-
Remove EIS from dash and un-plug green 12 pin plug
-
Remove blue 8 pin plug
-
-
-
The SKSNG447D4T requires an EIS modification. Professional installation highly recommended. The EIS may be sent to Mid City Engineering for modification. Please contact Mid City Engineering at 312-421-1114 or sales@midcityengineering.com if you would like to send in the EIS
-
Click here for EIS modification instructions
-
Make sure that you are using the correct soldering equipment detailed in the EIS modification instructions. If incorrect equipment is used the EIS could be damaged. Board level soldering is required.
-
-
-
Plug 8-pin factory blue plug that was removed EIS into 8-pin blue socket on supplied T-harness
-
Plug 12-pin factory green plug that was removed EIS into 12-pin green socket on supplied T-harness
-
-
-
Plug 12 pin green plug from T-harness into 12 pin socket on rear of EIS
-
Plug 8 pin blue plug from T-harness into 8 pin socket on rear of EIS
-
-
-
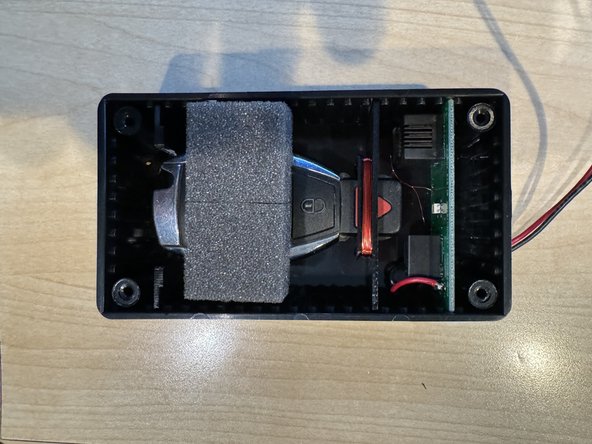
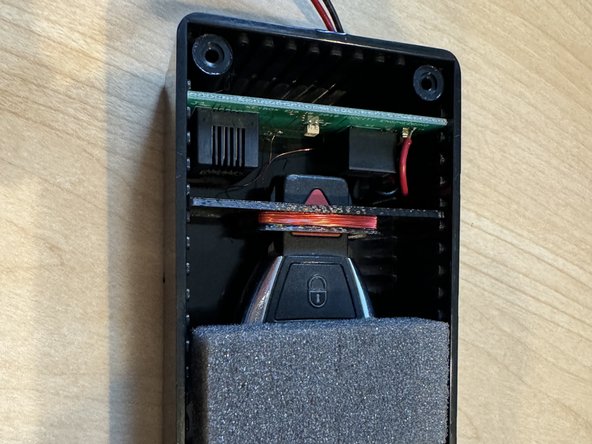
Remove battery from key
-
Insert key in key box as shown in picture. The key must be in the positioning shown in the picture.
-
Close and secure key box lid with provided screws
-
If the key box lid is not closed and any light is getting into the box, the remote start will not work.
-
-
-
Connect 20-pin connector from T-harness to 20-pin connector on SKSNG module
-
Plug 2-pin white plug from supplied key box to 2-pin white connector on SKSNG module
-
-
-
Make sure that doors are closed and vehicle is in safe position to start
-
To test remote start, press the panic button on the OEM remote 1X
-
If the OEM key does not have a panic button, use LOCK-UNLOCK-LOCK sequence from OEM key to remote start
-
-
-
Route EIS through left side of radio cavity and into dash
-
-
-
From inside vehicle with all doors closed, hit ‘lock’ on OEM fob
-
Parking lights should flash 3 times and the doors should lock
-
-
-
Open door from inside handle- siren should sound and parking lights should flash
-
-
-
Use zip ties to mount key box module and NG module together
-
-
-
Mount harnessing and module
-
Be sure to mount module away from any heat sources or moving parts
-
-
-
A Compustar DAS sensor can be added for shock, tilt, and vehicle movement security. This will integrate into the alarm included with the starter
-
Plug 4 pin cable from DAS sensor into 4 pin red plug on SKSNG module
-
Mount DAS sensor per Compustar instructions
-
-
-
Lock doors with OEM key fob
-
Apply impact to vehicle chassis - siren should alarm
-
-
-
A Compustar RF remote and antenna kit can be added for external control of remote start, alarm, and door locks.
-
Plug Compustar antenna cable into 4 or 6 pin blue plug on SKSNG module
-
-
-
Insert key and cycle from ‘OFF’ to ‘IGNITION’ (2nd position) 5X (ending in the ‘OFF’ position)
-
After 5th cycle, hit the ‘LOCK’ button on each Compustar RF remote that is being programmed (programming 2-way remotes first)
-
-
-
Using Compustar RF fob, test lock, unlock and start controls
-
-
-
Connect 4 pin connector from Compustar Drone module to 4 pin black plug labeled ‘DRONE’ on the SKSNG module
-
-
-
Using Compustar Drone app, test lock, unlock and start controls
-
-
-
Replace bezel and vents around radio and clip into place
-
Troubleshooting:
If vehicle receives the command, but fails to remote start, the parking lights will flash a # of times. The number of parking light flashes corresponds to an error code. To troubleshoot no remote start count the number of parking light flashes.
Note: after a brief pause, the error code may be followed by a shutdown sequence of 3X flashes after the initial code
Error codes:
4 Flashes: Valet mode. The remote start is in valet mode (remote start off). Click here for valet mode instructions using the instrument cluster menu.
5 Flashes: Wrong variant. Power cycle modules and try again.
6 Flashes: Brake depressed. The vehicle sees that the brake is depressed. If the brake pedal is not pressed down, it is possible that the brake switch is out of alignment. Check brake switch above brake pedal. If brake switch is out of alignment, you may see brake lights on all the time when the vehicle is started.
7 Flashes: Hood open. The remote start will not work if the hood is open or latch is not fully closed.
8 Flashes: RPM overrev. Vehicle sees that RPM is too high.
9 Flashes: Not seeing the key.
Check key box and connections:
Verify placement of key. If key is too far forward in key box or not far enough forward, there will be a key error.
Check to make sure 2-pin white port is plugged into SKS module and RJ cable from EIS is connected to key box. Make sure connections are secure.
Make sure key box is fully closed and secure and no light is entering key box.
Check EIS connections:
If there is an issue with the EIS modification, there can be a key error (9 or 11 flashes).
10 Flashes: Communication error. Check connections and power cycle module.
11 Flashes: Not seeing the key.
See 9 flashes (same error)